

THE INVITATION:
An e-mail went out inviting anyone who wished to participate to choose a saint to paint for a peg doll exchange. Once the number of the group and each person's saint was determined, the organizer ordered wooden peg dolls (here's what we used on-line from Woodworks, Ltd. at craftparts.com -- we used the 3"+ "Man Body" for male saints and the "Doll Body" for female saints), as well as a pack of inexpensive paint brushes and various flesh colored acrylic paint (the latter available for as little as $0.50 per two ounce bottle at Wal*Mart, Michael's, A.C. Moore, Hobby Lobby, etc.). Our organizer later was reimbursed for this.
OUR FIRST DATE:
Our organizer hosted our gatherings, but anyone may host. First, we all brought appetizers (the real reason for getting together -- good food in good company, right!?) and met one night at our organizer's lovely home to dispense the initial supplies and reimburse her. Then we all sat around various tables together (20 women participated), kabitzing and snacking while we painted all 20 of our own saint's face and head flesh (this is usually the base coat; more on that in a minute).
After that, we collected our newly begun saints and supplies and trundled home to complete their details over the next four weeks with various paints we had purchased on our own. We gave the pegs a final spray coat of varnish for protection, then got together (again!) to exchange them!
Easy! Right...? ;-)
You can do this! Here's how it went down at my house:
 STEP 1
I already had paints and brushes from previous projects, so I lined up my new naked peg dolls, ready to go! Each detail on every peg doll will get painted at the same time (e.g. - paint everyone's eyes all at once, then all the noses, then all the robes, etc.).
Make a simple sketch on paper and choose colors and symbols which will make your saint readily recognizable. For example, St. Therese the Little Flower wears a brown Carmelite habit and is holding a crucifix with roses, or St. Patrick wears green robes and is holding a shamrock, etc.
Stained glass windows and Eastern church icons are wonderful inspirations for saints' symbols! There also are several artists on-line who create beautiful saint peg dolls, both as a hobby or professionally. I'm not suggesting you steal their designs (that would be artistic plagiarism), but if you use them as a guide and your choices are informed by many it's called, "research."
Please don't be discouraged (as I initially was!) by the incredible detail and layers of dimension with which these talented artists on-line complete their peg dolls! As you'll see from the diverse results of our group's exchange, what really matters is that this is an endeavor truly accomplished with love.

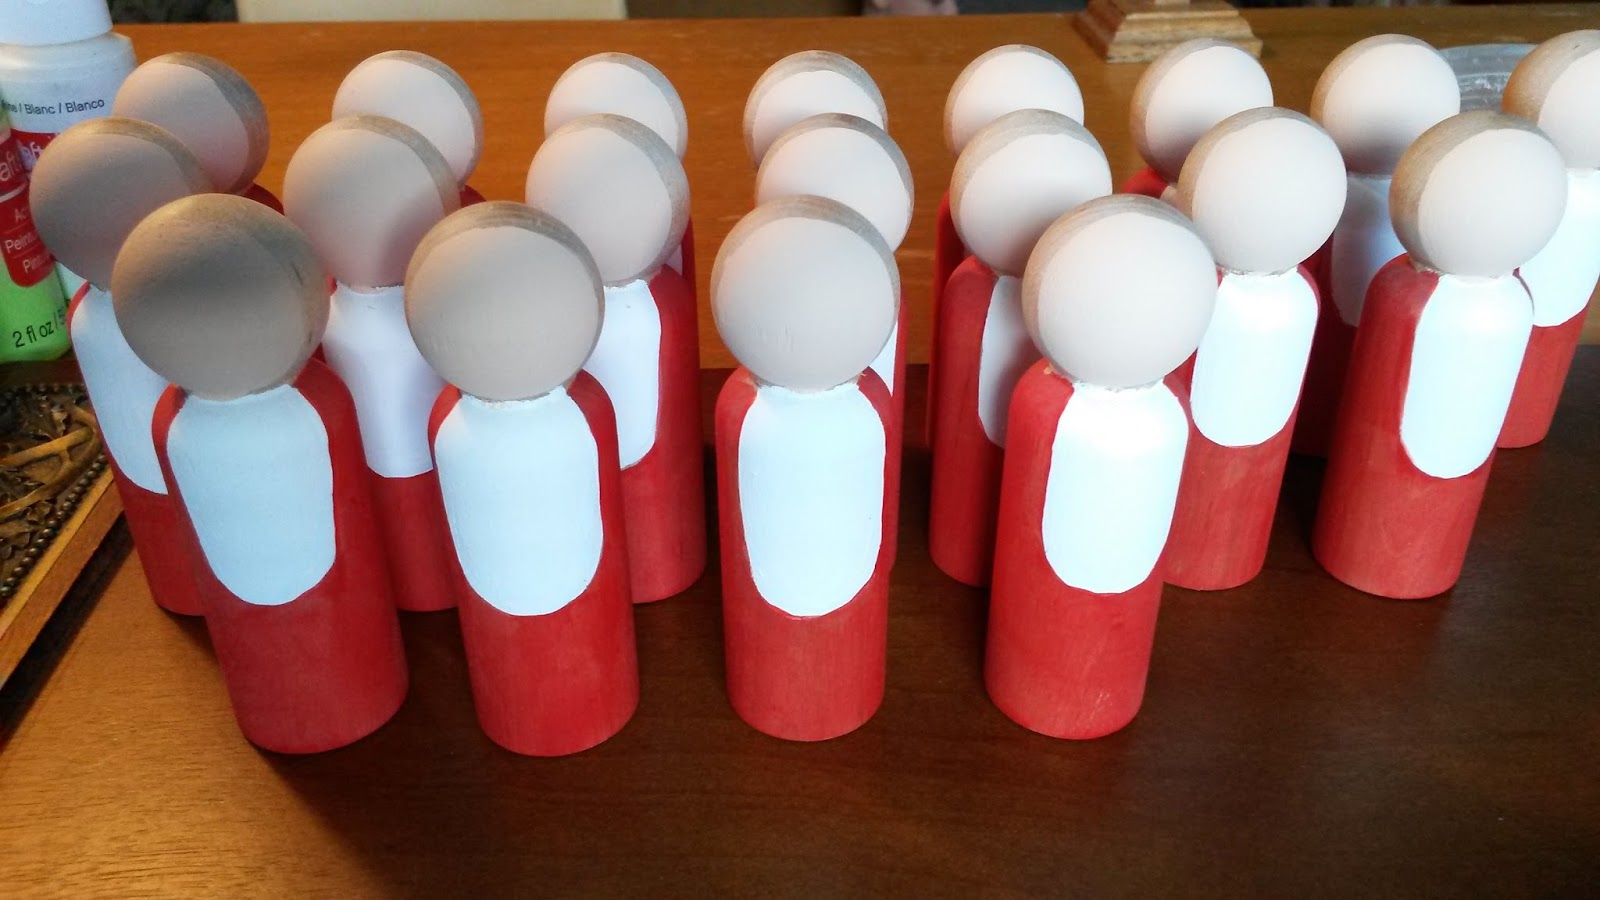
Paint your peg doll in layers, beginning with the lightest color and largest areas first. Do not worry about the edges being perfect. Think about it -- it's easier to paint a dark color neatly over the edges of a light or white area than it is to paint a white color successfully covering the edges of a dark one. I always begin with the face and head (often lighter flesh tones) or any large area that's going to be white (in this case, for the Sacred Heart of Jesus, Jesus's tunic is white).
In this photo, the peg doll on the left has one coat of white paint and the peg doll on the right has two. Depending upon the color and effect you want, two coats sometimes are needed for large base areas.
Ta-da! (....it's not a bib. It's a tunic!)

Then I painted the base for the faces...

...and the robes.
For the robes, I normally would like to paint a dark undercoat of reddish brown (I use one called, "Rookwood Red"), topped off by some light dry-brushing of a bright red (which I did during the previous saint exchange on the St. Nicholas peg dolls shown later in this post). But, this time, I decided that one coat of the bright red, leaving visible the natural grain of the wood, actually was a simple way to allow the wood itself to represent the folds and variations of his robes.
STEP 3
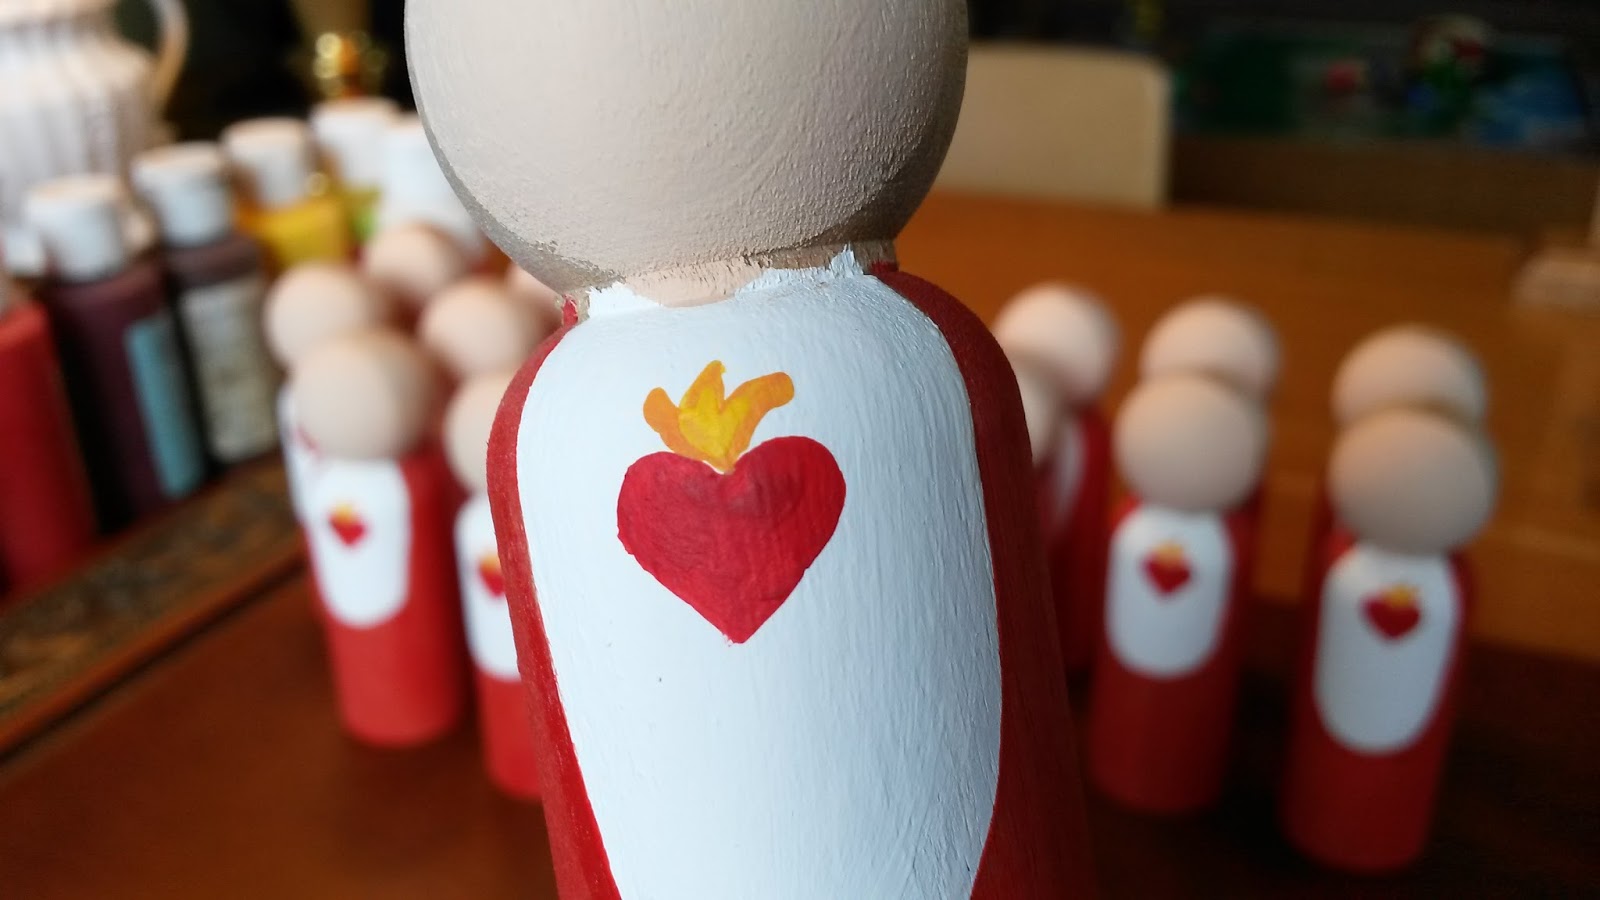
After you have painted the large areas of solid color, it's time to give your saints some personal details unique to him or her. When painting these tiny details, I remove the cap to my paint bottle and just dab my paint brush right into the bit of paint in the cap, as opposed to pouring a blob of paint on my palette (just an ordinary square ceramic tile). It wastes so much less paint and goes much faster! Because I couldn't resist, I painted the Sacred Hearts first:


Then I painted the brown hair on the head and shoulders, two brown strands on the forehead (a distinctly, "Jesus," detail in iconography), and a chocolate donut beard (sorry, I'm not good at beards).

This was followed by the tiny black cross and crown of thorns, for which I used one of those positively ingenious paint pens (otherwise known as God's gift to artistically challenged people like me)! I also used it for the center of the eyes.

Oooo! Pretty!
Then I painted the brown hair on the head and shoulders, two brown strands on the forehead (a distinctly, "Jesus," detail in iconography), and a chocolate donut beard (sorry, I'm not good at beards).

This was followed by the tiny black cross and crown of thorns, for which I used one of those positively ingenious paint pens (otherwise known as God's gift to artistically challenged people like me)! I also used it for the center of the eyes.

Although it is tempting, DO NOT USE A SHARPIE for any details on your peg doll! When you spray the protective coat of lacquer at the end, ink from a Sharpie will run down your peg dolls, completely ruining them (which I learned the hard way when I wrote black Sharpie crosses on all my St. Nicholas's white stoles last time...I had to repaint their fronts aaaaaaall over again....ugh!)

Back to our current guy! When painting eyes, start from the bottom up or the outside in, depending upon how you look at it. I painted increasingly smaller, concentric, pointed ovals or circles for the whites, the iris/pupil (which can be two separate colors, for example, blue irises and black pupils, but I just chose black for it all), and the glisten. The glisten is SO easy -- just dab a tiny brush or the end of a toothpick in white and dot it on -- yet SO important for bringing the eyes to life! Then I painted eyelids and eyebrows in varying shades of brown.

At this point, I realized belatedly I had not left enough evenings to thoroughly complete my 20 peg dolls before the exchange. Yet, I still hadn't given them a nose nor ANY of the details on the body (except the Sacred Heart). So, I had to sacrifice pride for punctuality and simply add the noses and a gold collar on the robe and call it a day, looking forward instead to the joy of exchanging saint peg dolls with other homeschool moms whom we love!

Thrilled to be finished, I lined up all my little Jesus fellas outside, ready to spray them with a protective coat of clear glaze. But then...disaster struck! The spray I used was from a can in our garage, which must have exceeded its shelf life. As I ran the spray can lightly back and forth over my guys, a horrible, dappled, white mist appeared on top of them! And it didn't go away! Not even 15 minutes later. ACK!!! All my hard work for naught!?

Thrilled to be finished, I lined up all my little Jesus fellas outside, ready to spray them with a protective coat of clear glaze. But then...disaster struck! The spray I used was from a can in our garage, which must have exceeded its shelf life. As I ran the spray can lightly back and forth over my guys, a horrible, dappled, white mist appeared on top of them! And it didn't go away! Not even 15 minutes later. ACK!!! All my hard work for naught!?

The white sprinkling obliterated their hair, their faces, their Sacred Hearts...all the details, everything!!! All my hard work, defaced. Literally. I went into my room and cried. Then, I stood up, mopped my face, and determined not to give up so easily.
I got a damp terry cloth washcloth and carefully and meticulously wiped off and retouched up with paint all my little peg men, doing what the nuns in my youth had always said, "Offer it up!" The peg dolls' hair and faces now restored, I got a brand new spray can of protective finish and gave everybody two light coats, spaced about two hours apart. Whew! Beautiful!

Because we were doing an exchange, each mom would wind up with a complete set of 20 DIFFERENT saint peg dolls, including one of mine, so I held one back for our family. Before I gave my guy his protective spray coat, I set about giving him the details that I wish I had allotted enough time to put on all 20 of the peg dolls....

On his front, I added a dot of sparkly red and orange paint to the Sacred Heart, as well as two hands and, edging his robe, a row of six gold and white lace crosses, representing our six children.

On either side, his hands come out of the folds of the arms of his robe, which showed the cuff of his white tunic, a gold band on the robe's cuff, and shadows and highlights throughout the folds. I used the same brown from his hair to outline the folds and bits of reddish brown and bright red to give the folds depth.

I wish I had been able to paint all 20 peg dolls with this level of detail for people whom I love so much!!! But, after finishing this one guy, I looked up at the clock and saw it had taken me over an hour just to complete these details on one doll. Sadly, with everything else our family has going on right now, I just didn't have several more nights before the exchange to spend at least 20 more hours painting.... :-(
THE EXCHANGE
For the completed peg dolls, we wrote our names, the saint's name, and the year on the bottom of the pegs with a fine point Sharpie marker (you can use a Sharpie on the bottom of the raw wooden pegs, because that doesn't get painted nor sprayed with the lacquer finishing coat). Then everyone will gather at our organizer's home for another fun evening with faith-filled friends! When I receive the new set of 20 peg doll saints, I'll post a group picture here.

For some of the women painting their peg dolls, the project became a delightful, solitary, silent, therapy late in the evenings after a busy day, with the wee folk in bed. For others, it became a family affair, with moms painting the base coats and teens painting the teeny tiny details. One mom, who painted St. Faustina, said she even found a shortcut by decoupaging a miniature paper cut-out image of the Divine Mercy onto the front of her saint! She painted the bodies, one child applied the Divine Mercy decoupage image, and her teenager painted all the facial details. How clever!
IN CONCLUSION
However you decide to paint your dolls, you have to look at it like cooking -- the main ingredient that matters is LOVE! These wonderful women chose to give up some of their mornings, afternoons, or evenings to paint and then get together to exchange inspirational, old-fashioned, Catholic, wooden people.
For some of us, our saints will be lined up on a shelf in our schoolrooms, smiling reminders of what we ALL are called to be. For others, a few treasured favorites will be distributed to our children, perhaps as a reminder of their patron or Confirmation saints. And for others, our children will use them gently as sacramentals and as play things (as in the time I walked into the living room, so proud after my children had ardently quizzed me on who each saint was, only to discover the saints lined up in two rows facing each other, with my son chanting delightedly, "Red rover, red rover, we dare Padre Piiiiiio over!").
Regardless of your motivations, the real benefit is the renewed and shared love, affection, and faith, as well as the peg dolls, exchanged within your group! After all, who made us?
God made us.
Why did God make us?
God made us to know, love, and serve Him in this world and to be happy with him forever in Heaven.
Those who are happy with God forever in Heaven are the saints. Remember? We say it every time we begin the Rosary with the Apostles Creed -- "I believe...in the communion of saints..." Who better than the saints (who now reside in the actual presence of God!) can provide each of us with an instructive guide on how to become saints ourselves!?
Study the saints. Learn from them. They are our elder brothers and sisters in faith.
I saw a quote recently that said, "Every saint has a past and ever sinner has a future." We all are both -- sinners who are called to be saints. God will take you whereever you are, but He doesn't expect you to stay there. He expects you, too, to take up your cross and follow Him -- all the way to Heaven forever!
Wow! Ain't that great!!??
Amen!
P.S. - Here's another GREAT blog post with step-by-step instructions, lists, and photos on how to paint a peg doll! Enjoy!
http://www.catholicmissionaryfamily.com/2013/09/how-to-paint-wooden-saint-doll.html

No comments:
Post a Comment